Class Roster
Academic Affairs and the Office of Student Records strongly encourage the review of class rosters in MaineStreet each semester after the end of the add/drop period in order to verify student enrollment. If a student does not appear on the roster of a class he or she is attending, or does appear on the roster but is not attending the class, please direct him or her to the department/school or dean’s office to resolve the discrepancy. Graduate students should be referred to the Graduate School.
Class roster accuracy is a basic step in ensuring the safety of the campus and our students. Any concerns for a student should be directed to the Office of Student Life at 581-1406.
Instructions on accessing class rosters in the Faculty Center are provided below.
Log on to MaineStreet using your UMSID and Password.
Navigate to the Faculty Center: Self Service>Faculty Center
![]()
Viewing your Class Roster(s)
a) Verify the term for which the class rosters are displaying and change if necessary using the “change term and/or institution” button.
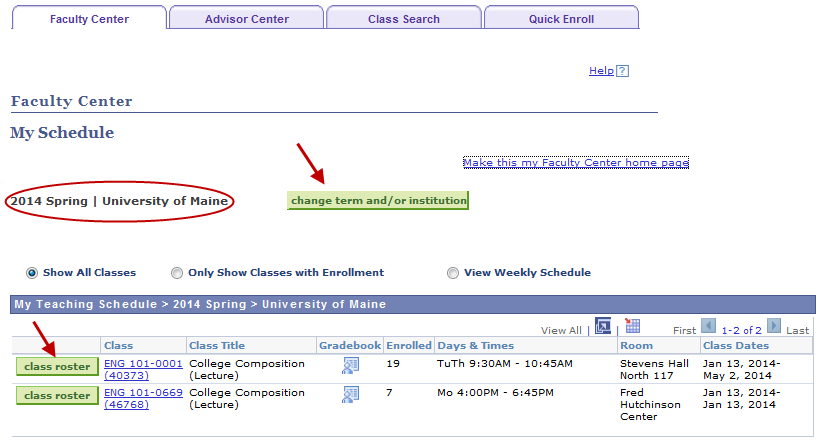
b) Select the “class roster” button next to the corresponding class displayed in the “My Teaching Schedule” List.
About the Class Roster Details
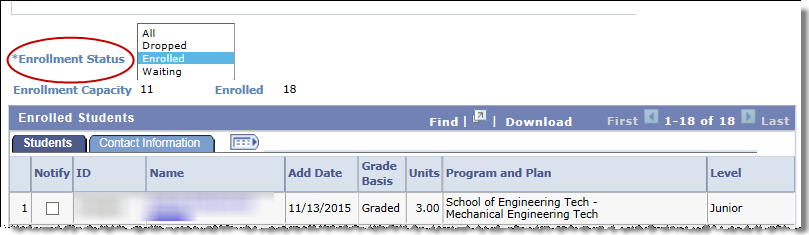
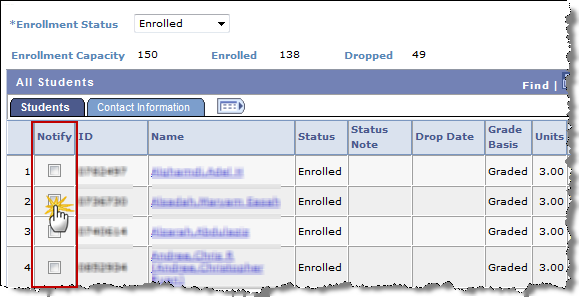
The MaineStreet Class Roster provides a variety of information pertaining to the students associated with a class. The Enrollment Status drop down list offers options for displaying the list of students: All, Dropped, Enrolled, or Waiting. The status of Enrolled is the default setting meaning when the class roster first displays, it’s showing only those with an enrolled status. Students that have been dropped will display when the Dropped status is selected. Students on the Wait List will display when the status of Waiting is selected, and the All option shows everyone regardless of enrollment status.
Other columns containing helpful information are the Add Date, Drop Date and Status Notes columns. The Add indicates the date on which the student was enrolled in the class. This may be useful for monitoring new enrollments after the start of the semester. The Drop Date column will show the date on which a student dropped or withdrew from the class.
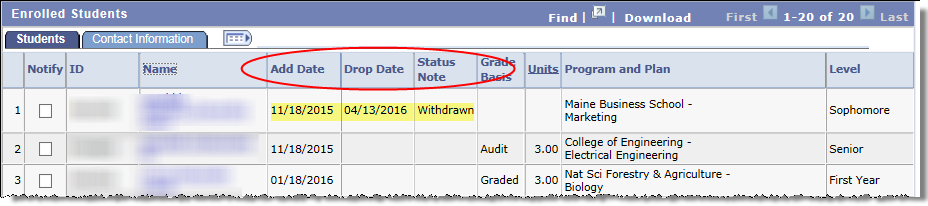
The Status Notes column provides details associated with the enrollment status. If a student has withdrawn, the Status Notes column will also display a “Withdrawn” message. (Note: Withdrawn students will appear on the “Enrolled” list.) Students who were added to the Wait List and later removed will have a “was Waitlisted” message in the Status Notes column.
When viewing the students with the Waiting enrollment status, each student’s position on the Wait List is shown in the Status Notes column.

Values that display in the Grade Basis column reflect the grading option for the student. The most commonly seen Grade Bases are: Graded for the letter grade (A-F) option; P/NP indicates the Pass/Fail grading option; Audit is shown for students who opted to audit the class.
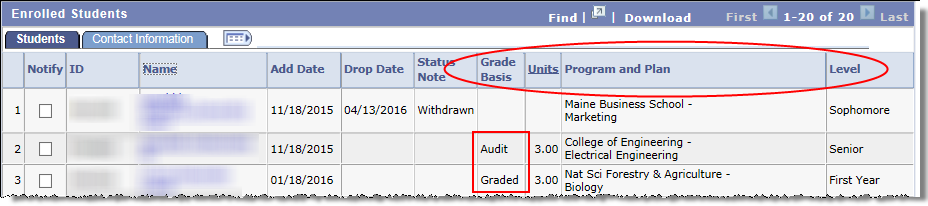
The Units column specify the number of credits for which the student is enrolled. (It’s most important to review this when the class is offered for variable credit.) The Program and Plan column indicates each student’s college and major. The Level column provides the student’s current class level based on overall earned credit hours.
The Contact Information tab reveals the preferred phone number and email address for each student.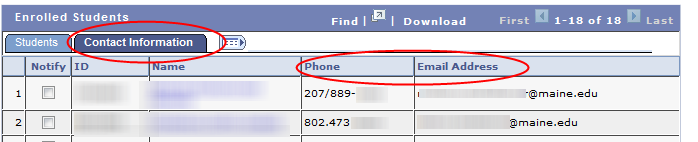
Class Rosters for Combined Sections
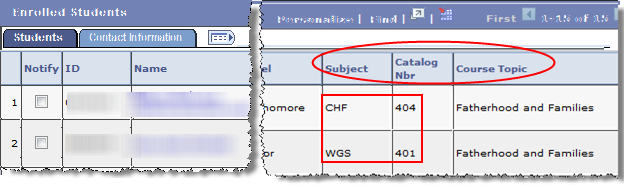
If the class is one of a combined section group, the student listing includes enrollments for both classes. If the combined section group consists of more than course, the Subject and Catalog Nbr columns indicate in which course the student is enrolled. Additionally, the topic of the class will display if one exists.
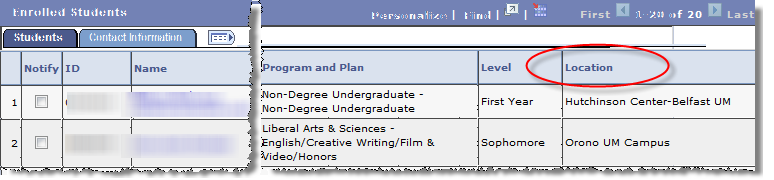
And, if the locations of the sections are different, those will display as well.
Saving the Class Roster
a) Select the Download link at the top of the roster as shown below. (Note: If your browser’s Pop-up Blocker prevents the download, follow the browser’s instructions presented to you for how to allow the download to continue.)
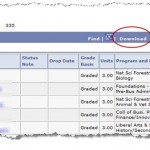
b) When the File Download box appears, select “Open. “
c) The roster will open to an Excel spreadsheet. Change the column width to automatically fit the contents: To quickly autofit all columns on the worksheet, click the Select All button, and then double-click any boundary between two column headings.

d) Save the spreadsheet.
Sending Notifications to Students from the Class Roster
a) To notify all students on the roster, scroll to the bottom of the Class Roster and select the “notify all students” button
OR
To notify a selected set of students, use the box provided in the “Notify” column of the Class Roster to indicate which students are to receive the message. Then select the “notify selected students” button at the bottom of the Class Roster.

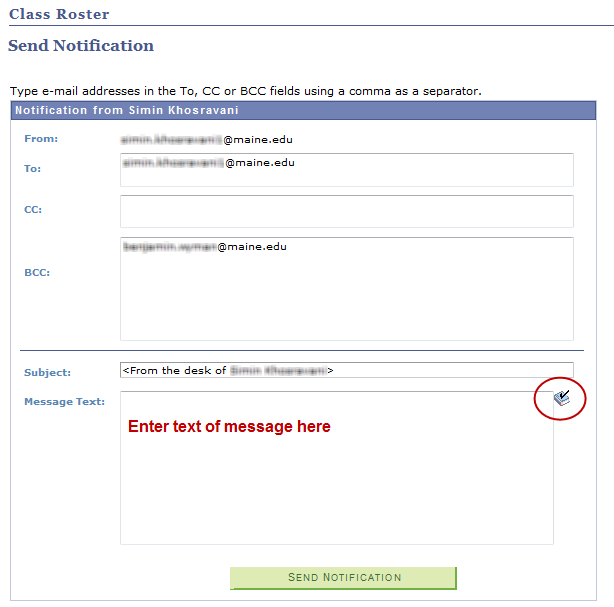
b) The “Send Notification” page (see page 4) will display with the “To” field pre-populated with your email address and “BCC” field pre-populated with the email addresses of the students selected.
c) The “Subject” field may be changed if desired.
d) Enter the text of the message to be sent in the “Message Text” field. (Tip: Use the spellcheck icon ![]() to check the spelling of the text.)
to check the spelling of the text.)
e) Send the message by selecting the “Send Notification” button.